Let’s do the time warp again…

The most interesting part about buying an older house is the time capsule you step into when you walk into the house’s bathrooms. Our house was built in 1960. Our main bathroom has been preserved since.

Hard to tell in this before picture, but the ceiling is mint green like the tile, as is all the trim and the door. Also, the floor is olive green with black. 

I have hated this bathroom since day one. The day we closed, our first “project” was tearing down all the wallpaper in this room, which revealed black and, yellowed glue covered walls. After that, we sort of gave up on this room for about 3-4 weeks. 

I finally used this room as my practice room for skim coating and spent 2-3 days loading on compound, and painted the ceiling. After that, we didn’t touch the room for about two months. A couple weeks ago, I decided I really wanted to just finish this room already and just have to embrace the retro tile and colors. 

We decided the next step would be to paint the laminate vanity, which was green with that weird boomerang pattern from the 50s. We used an extreme bond primer to prime it, and even though I preach sanding and prep work to all of my customers, I did no prep work and put the primer right on. A thin coat works a lot better at bonding then a thick coat FYI. 

One coat of primer seemed efficient, and also made such a difference already in this room. We decided to do a high gloss black in an acrylic enamel for the top coat. 

After this one coat of black I started to really believe in our project and that retro done right might not be so bad. 

We decided to paint the walls a bright white in an eg-shel, and the remaining trim, mirror, and door in the same high gloss black. If you ever use a high gloss for any projects – beware! Brush and roller marks show up very easily no matter how carefully you paint. We added a product called floetrol to the paint that gives the paint added flow and leveling. 


There are a few touch-ups left to do, and decorating, but it’s such an improvement from the over powering green! Both Ted and I have come to actually like this bathroom from the little projects we’ve done to make it a little less dated, but embrace the tile and color scheme! 

Thyme for change….

Let me start with this: I love gardens. Well, I love the idea of gardens. However,  I have a very black thumb. My freshman year of college, my mother sent me with a very hardy plant that she said was impossible to kill. I watered it regularly, made sure it got sun, but by the time she visited me a month later…. it was on the verge of death. I have gotten better with age; I am the mother to a beautiful 12 month old aloe plant that has survived our apartment and moving, and the sunburn from that one time I left it out in the sun for 3 days. 

My mother, on the other hand, is a wonderful gardener. My parents house is surrounded by beautiful gardens and she spends every weekend and afternoon out playing in the gardens. 

When we bought the house, my mother agreed to help me set up my gardens and rip out the shrubs and other plants. Last weekend, she helped thin out some overgrown areas and planted some grasses. 

I decided that I would tackle putting in my vegetable and herb garden all by myself. I love veggies from the garden and fresh herbs, and since we got the house, I’ve been looking forward to having my very own. I went to Adams for my gardening supplies (and got over excited and bought over 20 plants).

We have a little path up to front door and I planned to plant it alongside of both sides. Between winter and now, the plants went crazy that were already planted. 


Trying to dig these guys up and transplant them took over an hour! The green leafy one, was the width of a grown mans waist and so heavy! The root systems of both plants were not happy to be moved and held tight. I transplanted both to a different garden. I then spent the next hour or so hoeing the ground to turn over the soil, as well as add some fresh dirt to fill it back up. 


I used to black netting after since this will make weeding and taking care of the garden a lot easier. I held it in place with some bricks lying around the yard. My mom always uses stakes when she does this with her gardens so you don’t even see the netting or rocks holding it all down. 

The strip I did for this garden is about 3 feet wide and about 10-12 feet long. A nice little beginner size, but as I said, I got overexcited and bought so many plants I knew there wouldn’t be enough room. 

After all the netting was placed, I used a razor blade to cut little slits to plant all my little baby plants. 


I planted 4 Roma tomato plants, 2 sweet red pepper plants, 4 chili plants, and 4 jalapeƱo plants in this section. I then covered all my work with black mulch and watered everything really well.  

Please excuse my chunky finger over the lease but look how cute! I ended up squeezing my basil, lavender, and golden mint plants on the end. 

I found some containers to plant half of my other herbs in (cilantro and parsley), and then found a nice sunny spot for my other lavender and sage plants to run wild – apparently they spread like crazy! I also have a rosemary plant I stuck into another garden I didn’t mind if it took over. 

This garden is now my baby. I am super nervous but so excited to watch it grow this summer and see if my veggies will be edible by the end of the season! 

One garden down, everything else to go!

Patio rejuvenation…


On the side of our house, off the kitchen, we have a small patio with really big rocks. Neither of us really loved it but figured it would suffice until we had a chance to add a deck on the back for entertaining. I decided I would try to spruce it up, but these rocks are so big and heavy; 3-4 inches thick and most are about 2 feet in length. We originally planned to lift all the rocks out, add more soil and netting to prevent weeds from between the rocks and then fill around them. The weight of the rocks made this nearly impossible for us to accomplish just the two of us. We had to do it a different way. 

Supplies:

  • Long handled dandelion puller or other skinny instrument
  • Garden hose
  • Potting soil 
  • Round-up or other weed killer
  • Paver sand 
  • Deck stain (optional)
  • Push broom

Total time: One weekend day 

1. Instead of waiting for help, I used a dandelion puller to start pulling out all the moss and weeds from between the rocks without moving them. 

The first picture shows the tool I used for the most part to loosen everything. Worked perfectly because it was skinny enough to shove under edges of the stones to straighten out as needed also. 

2. Once everything was loosened up, I used a push broom to get off the weeds and big debris. 

3. I put my dad to work using the hose on high pressure to clean off the excess dirt and between each crack so that the space between each rock was 1/2-1″ inch wide and 1-2 inches deep. 


4. We repeated this process twice, but took about a half break after using the house the first time to give everything a chance to dry, and just to make sure we got everything out. 

5. We fixed all the stones that had unevenly settled by throwing a handful or two of potting soil underneath. 

6. I used round-up in every space to ensure the weeds wouldn’t come back anytime soon. 

7. We picked up half a dozen bags of gray paver sand to fill and pack between the cracks. A bag goes .5 cubic feet. We had two steps to fix, the patio (approx 10×10 feet), and a stone path we plan to do as well with the excess. We poured it across the patio, and using the push broom, swept into the spaces, packing it down as we went. We misted it with the hose after we were done with the first couple bags to pack it in more. Once it dried, we added more sand. 


After 2 bags of sand.


Now we have a nice little outdoor haven! We’re slated for rain the next couple days, but we plan to stain the wood a gray to match. Once we’re done with that I’ll post some more pictures!

Hardwood floor refinish

The project that has been the most intimidating, daunting, and also exciting, is our hardwood floors. All three bedrooms have original hardwoods, and hiding underneath all the carpeting is more hardwood. We really don’t like carpeting, plus it affects Ted’s allergies, and when we were house searching, hardwood and laminate were top of our list, since it would be a big first expense to completely replace the floors day one. 

Our master bedroom has been the first project; once it’s completely done we can officially move in and work on the rest of the house as we go. We’ve also been debating whether we want to refinish ourselves or hire it out. We decided that we would try to do the master ourselves and depending on results, whether we would do the rest ourselves or hire it out. Check out the steps we took, the pictures of our process, and our final results!

Supplies:

  • Palm sander (we own a Milwaukee $50 one, so cheap and so helpful!)
  • Sandpaper – 80, 100, 120, 220 grits
  • Sanding block
  • Pole sander
  • Mineral spirits
  • Fast drying satin polyurethane (MiniWax)
  • Tack cloth
  • Soft, lint free rags
  • Lint-free cheesecloth textured rags
  • Push-broom

Total time: 2-3 hours each day, over the course of 5 days, not including dry time between poly. Total project was one week. 


1. The picture above, you can see there are lots of scratchs, wornout finish, and altogether, a lackluster finish. We liked the colors though since the boards had all types of different tones and colors coming through from the original stain. With that, we determined our plan of action: clean, remove the old polyurethane finish, sand out minor scratches, clean, and re-polyurethane.

2. I used hot water with TSP-phosphate free to start removing and cleaning up the surface grime and wax build-up. 


This helped remove some of the dark amber-ing from the wax they had applied to give it some of that shine. I repeated this cleaning twice. 

3. Sand, sand, sand! After the floor dried, came the really exhausting part. We had decided against a drum sander; neither of us felt comfortable using one with the possibility of really messing your floors up. Since we had decided that we wouldn’t be removing the original stain, it wasn’t necessary to use that machine. Instead, I grabbed a pole sander, a palm sander, and the different grits we would need (80,100,120,220). The pole sander didn’t work for the first sanding with 80 grit. The floors have settled and there is highs and lows in the floor making it hard to get an even sand with the pole sander. Using a sanding block wrapped in the correct sand paper, on my hands and knees I sander every inch of the floor, through the scratches and old finish. 


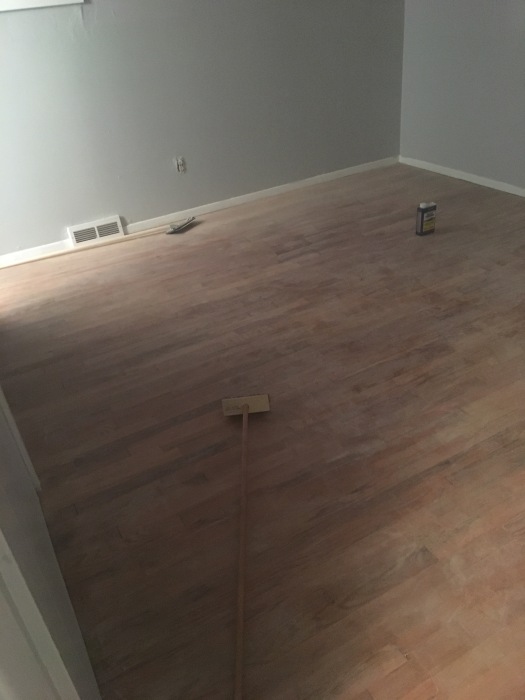
4. Sand…..again! I repeated the process now with 100 grit and then with 120 grit, with the help of a palm sander as well. This softened the sanding scratches from the 80, and gave us a very smooth (and dusty) finish. The stain didn’t come up much at all, so no boards needed any stain. I could tell we were sanding deep enough since the first sanding had this dark amber dust (the old finish) and as we sanded more, became lighter in color, like sawdust. 

5. Clean all dust on everything and everywhere. This took forever! First, I swept up all the dust I could, using a regular broom and a push broom. After a few sweeps of the broom, I went back through making sure to sweep the dust boards, wipe down the windows, and walls. This was the most important step, because no matter how well you apply the poly and how well you sanded, dust is the enemy and can ruin the final appearance and adhesion of the floor. I also took the time to change my clothes, which were full of dust. After I finished sweeping, I used a soft cotton rag all over the floor. Then, once the rag was coming up clean of dust, I took a package of lint free cloths with a similar texture of cheesecloth, dampened with mineral spirits. On my hands and knees (and rags under my knees and feet), I rubbed every last bit of dust out of the boards, in the direction of the grain. 

6. At this point, I let the mineral spirits disapate for 30 minutes to make sure everything was evaporated. I ran a clean cloth over the floor to check for dust and there was none. I prepared for polying. We used MinWax Super Fast-drying polyurethane for floors, in a satin finish. It’s a more forgiving finish, since we wouldn’t know until the first coat how well we had sanded and cleaned. 

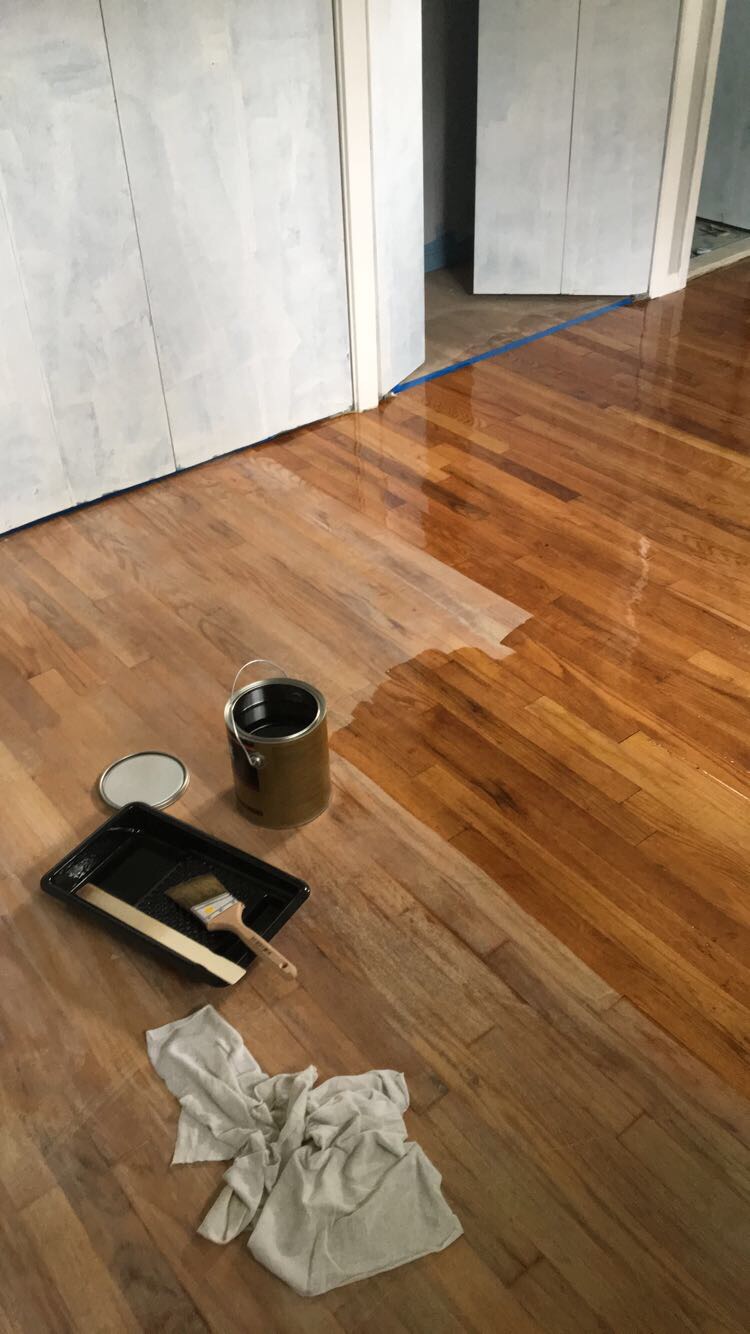
7. Using an approximately 4 inch lambskin block, and natural white china bristle brush, I started in the furthest corner. I went 8-10 board width at a time, and cut in the edges. Then using the applicator, I applied the poly to those 8-10 boards and worked the entire length of those boards. Once the length of the room I came back to the starting point, and did another 8-10 boards in the same fashion, making sure to brush into finished boards to prevent lap marks. It is so important that you are keeping a constant wet edge to prevent lap marks and lines. I worked the entire floor this way and worked myself out of the room. 


8. Let it dry! Even though this is a fast drying poly, it still takes at least 4 hours to dry! We let it dry for approximately 36 hours before going back in. Ted went in to shut windows at this time and the finish looked awesome. There were a couple spots near the edges where the finish was duller and not as vibrant because they were the highs of the floor and the poly was thinner there. 

9. In between the coats of poly, I used 220 and tack cloth to get every piece of dust up. Once it was clean again, I followed to same method of polying, but with a 10″ lambskin applicator instead. We then left it alone again.  

10. Enjoy! The floor looked AWESOME when it was done. We have a couple more things to pull together to complete this room, but once touch-ups and our furniture and decor are put in, I’ll show you the final product!